Address: The North Chapel, Ashlands Road, Ilkley, LS29 8JT


September can feel like the start of the new year for many particularly as it’s when the school calendar starts. Some students say that they often launch into September with new resolutions. On my list is shedding a few pounds post holiday, reducing our single use plastic and I noticed Love Your Clothes have launched ‘Secondhand September’.
I have always hated clothes waste, and I wanted to share with you what I have been up to the last few days, in an effort to reduce waste and recycle in so many different ways.
Label
New school uniform was unpacked and washed and labelled. I know its not a job loved by all by name labelling really does mean things get returned to you if lost. (once even a school coat – but I had also written my phone number on the label). Yes of course my children have hand sewn on name labels! Outgrown school uniform has been passed on to other homes where they were gratefully received.
Sell
Worn only a few times sports footwear has been sold on internet for sale forums.
Store
The holiday clothes have been sorted and packed away for next summer in a moth proof zip bag. Pre-loved immaculate curtains have been hung. Summer clothes that won’t fit the children next year have been put to one side for family members.
Up-cycle
The old curtains (not good enough for the charity shop) and school jumper covered in permanent pen have been taken to the local textile recycling point where they will be sorted and up-cycled.
Re-use
Today I am wearing a Boden dress that I bought in a charity shop for £8. It was floor length, hadn’t been worn – not that that would bother me, so it has been shortened into a shift so that I wear it frequently. In last nights class one student was mending a blouse and re-hemming trousers, whilst another was cutting up worn out jeans to make patchwork cushions.
Recycle
Over the summer I watched a fascinating TV programme where landfill over the last few decades were being excavated to see what had deteriorated. The excavation of a 1970s site near Birmingham produced a complete polyester child’s garment.
Please think before you throw any textiles in the bin!
September 18, 2019
Students often select the wrong zip. Once they have found the right colour and the right length they often pick up the wrong type!
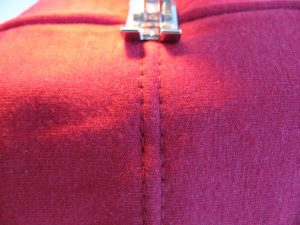
Here’s an easy guide to navigating your way around the zip display in your local haberdashery store:
Zips fall into three categories; Regular, Open Ended and Concealed.
Regular are the most common. You use these in skirts, bags and cushions. They are easily identifiable by the square ended zipper pull, shown as the bright pink one in the photo.
Open Ended – selected for the right length and colour – but mostly bought by mistake. These are used for garments where two sides come apart – think anoraks or on a tent! They feel chunky and have a large square zip pull and sturdy plastic zip stopper. YKK open ended zippers have a blue info label and is shown as a white zip in the photo.
Concealed zips are used in dressmaking or posh cushions and are identified by the slim line teardrop zipper pull. Sometimes called an invisible zip, they give a very elegant finish to a garment as there are no visible lines of stitching attaching the zip to the garment. This is the red one in the photo. Note they can only be inserted correctly with a specialist concealed zipper foot – which don’t come as standard supply with most machines. We do of course have these in The Sewing Shed for students to try.

March 7, 2019
Last week I posted on social media a photo of a students work where she had lengthened her daughters very pretty (and expensive) summer dresses by adding a complimentary hem on them to give them a few extra centimetres to ensure that they could be worn this Summer. The result was a very pleasing detail that actually added to the overall look of the garment – not a hint of Mummy’s been let loose on the sewing machine and look what she’s done!
As a Master Crafter I am encouraged to enthuse my students and the great British public into up-cycling and repurposing garments and household textiles, and I thought I would share with you a few fashion hacks to update your loved children’s items of clothing to get more out of them.

January 24, 2018
Making bright updates to your home can really be fun and this hour long project is easy to achieve and as well as a thrifty win.
So often your ironing board cover becomes stained, unsightly and even torn, by making a cover you can quickly update the unsightly board that needs to be banished to the cupboard to an item you are pleased will grace your laundry or sewing room. I regularly update the covers for The Sewing Shed as they get quite a lot of use from students, here’s my quick guide to sewing one in an hour.
What You need : A piece of fabric at least 7 cms bigger than your ironing board. An air dry fabric marker pen, 38mm bias binding, 1cm wide elastic, thread, Large safety pin.
Top Top: Read through the instructions fully before you start!
Preparation is key. I always wash the existing cover to remove as many marks as possible and use it underneath as it adds padding to the board which helps with the longevity of the cover.
Choose bright fabric that adds a splash of colour or fun to your laundry room but ensure that it is cotton so that it can withstand the high temperatures of the iron.
Make your self a card template 7 cm (2 3/4″) wide by 20cm (8″) long.
Lay your fabric flat on the floor wrong side up.
Fold the ironing board flat and place on top of the fabric on the floor.
Use an air dry magic marker fabric pen and your card template against the edge of the ironing board to create an outline of the board, 7 cms wider than the board.
Remove the board and cut out on the magic marker line, before it evaporates!
The amount of bias binding (and elastic) you will require depends upon the circumference of the board. Place the bias binding on the right side of the cover, lining up the raw edge of the bias binding with the raw edge of the fabric. Pin at right angles well, all the way around the circumference. I folded under the edge at the beginning and the end for a neat finish.
Sew the bias binding in place, sewing around the circumference along the crease line (approx 1/4″ from the raw edge).
Fold over the tape to the wrong side, so that the first seam line is on the edge. Finger press. Pin well in place and edge stitch the bias binding, creating a tube. Attach the elastic to a large safety pin and thread though the bias channel tying the ends together. You may need to try the cover in situ to ensure the elastic is tight enough.

September 6, 2017
Piping is experiencing a resurgence with many students tackling this skill with great enthusiasm at The Sewing Shed over the last couple of weeks. My lovely friends at Janome have sent me a couple of piping feet to make the whole process an awful lot easier, but you can tackle it with your under used zipper foot. Most sewing machines come with three feet as standard; a normal ‘sew all’ foot, a button hole foot and an a-symmetric zipper foot – which can be used for creating piping. The lovely bespoke piping foot has groves underneath the foot so that you can actually sew closer to the cord so it really does help with accuracy, particularly for the novice sewer.
To create piping measure the circumference of the cushion you want to pipe and add an extra 10cms to allow for a seamless join. Piping cord is sold in varying thicknesses, I recommend 5mm width 3 ply cotton cord for home furnishings. Thinner ones are used for dressmaking. Piping can look fabulous with home made binding to enclose the cord, either the same fabric as the cushion or a bold contrast. To make the bias to cover the piping cord measure the circumference of the piping cord by wrapping your tape measure around it and add 3cm seam allowance. A 5mm cord would require a 4.5cm wide bias strip. Fold your fabric at 45 degrees to create a bias and carefully measure your width of strip, being careful not to stretch the fabric. Mark this well with a magic marker and cut carefully. Two or more strips may need to be sewn together to create a piece long enough.
Fold the bias strip around the piping cord matching the raw edges, pin really well and tack on your sewing machine using a zipper foot and a long stitch length. Pin the piping cord to the right side of one side of the cushion, ensuring the raw edges of the cushion and raw edges of the bias tape match up. Take particular care on the corners stretching the piping a little to ease around the corner. To join the raw ends of the piping cord I would recommend a novice sewer simply overlap them on the bottom side of the cushion, so that the raw ends are enclosed in the seam.
Use your zipper foot with the needle as close to the pipe as you can or embrace a lovely shiny new piping foot at The Sewing Shed, to sew the piping to the cushion. On the piping foot a groove on the underside of the foot accommodates the piping so it ensures you sew equidistance from the piping cord at all times.
Pin the back of the cushion to the front, right sides together lining up raw edges neatly. Pin well and sew from the wrong side of the front so that you can see your line of sewing where you attached the piping. Remember to leave a turn through gap to ladder stitch closed once the cushion pad is in situ. Again, use the zipper or piping foot to achieve this. Piping foot shown below, with grooves clearly visible.

June 14, 2017
I am enjoying an indulgent day of sewing as Daddy-daycare is in full swing. This has enabled me to get to grips writing my latest article for Sewing World. What better way to enjoy a wet bank holiday Monday than to create a colourful patchwork project!
Sewing this latest article and photographing it as I went along, I realised that I was able to create a very pleasing end result just using scraps of fabric I already had. Like many of you I have a stash of scrap fabrics that I cannot bear to part with, as they might just come in useful for something! I must admit that they have all been sorted into “long & skinny”, large enough for “squares” and “tiny but useful for applique”. Today selecting by colours of the rainbow meant that a rather hotchpotch assortment of scraps became something very pleasing to the eye.
Some of my students lack confidence with colour and pattern. My eye for colour and great diplomacy has assisted many students in the last few weeks. Those unsure if a pattern or colour would suit them have been guided to choose those that flatter their skin tone and that they are comfortable to wear. Helping a student select contrast buttons, rather than a near miss for a skirt she had made, ensured she had a finished garment that had a professional edge rather than a homemade look. Suggesting complimentary plain fabrics to go with a bold patterned patchwork gave the overall quilt a designer feel.
Top Tips for working with colour: Consider what colours you already wear? Would you really wear the lime green just because it is on offer? Take the fabric to the store when selecting thread, buttons and zips. Red & Green really shouldn’t be seen together (and by the way are the hardest colours to colour match to).
Educating students to select fabrics and notions whilst considering the colour can be as rewarding as helping them get to grips with the dressmaking patterns itself!

May 29, 2017
Summer is just around the corner and my little girl can rock an applique T-shirt with jeans! Here’s just a couple from her wardrobe. The strawberry one was completely created by me and she wore it a few years ago and is now a useful teaching aid in The Sewing Shed. The pineapple one is a recent up-cycle from a much loved out grown t-shirt now gracing one for this season. Both base t-shirts were purchased from the children range at Asda.
How to? Successful applique depends upon really good adhesion to the base layer as a temporary measure to keep it in place whilst it is sewn. The strawberry motif was drawn onto applique paper, roughly cut out and then heat sealed using the iron onto the wrong side of the strawberry fabric. Novice applique artists, and those observant ones amongst you will notice that the strawberry is symmetrical, this makes it easier as in the process of making the applique motif the design is flipped, so if you use an a-symmetric design you need to draw it back to front onto the paper. Once the paper has been stuck with the iron you can trim to the exact shape that is required. The backing paper, which peels away to feel like tracing paper, will leave a glue residue on the fabric which when heat is applied with the iron will stick in place. The green stalk was created in the same way and overlaid the strawberry.
The pineapple one because it made of sequins and cannot transfer heat well so this was held in place with carefully cut pieces of bond-a-web and heat applied through the t-shirt.
Both motifs sewn with matching colour thread, changing to green for the stalks.Changing the colour thread has really helped to give it a professional finish.

April 27, 2017
Stretch fabrics are becoming increasingly popular in classes, and use of an over locker is giving a really professional finish, but students are wanting a more professional finish for hems and necklines.
If you purchase a shop-bought t-shirt you will notice that the hem appears finished with a looped thread from the wrong side of the garment and from the right side of the garment there are two rows of parallel stitches. This is produced by a cover stitch machine but can easily be re-created by the domestic sewer with the use of a twin needle on their sewing machine.
The twin needle has a single shaft that fits all sewing machines, it creates the parallel lines on the right side similar to the cover stitch effect and on the reverse the bobbin thread produces a zigzag as it travels between the two needles. The zigzag stitch of the bobbin straightens out when the fabric is pulled so that the thread does not break.
Each needle is fed with its own thread, the Janome machines we use in class have an additional thread holder to accommodate the second thread. If you machine doesn’t have this attachment you can always place two spools or a spool and a bobbin (if the shaft isn’t long enough) on the thread holder. The machine is then threaded up in the same way as when using one thread, but it may be necessary to miss out the last hook above the needle so that the threads do not get entangled.
Press up your hem allowance, a 2cm hem looks good on a t-shirt top and pin in place from the right side of the garment. Sew 2cms from the folded hem edge so that the parallel straight stitches show on the right side and the raw edge of the hem is caught with the zigzag stitch on the reverse. Twin needles come in different sizes and this relates to the distance between the needles, a 4mm is suitable for a hem.
April 5, 2017
Concealed zips with no stitches being visible on the outside of the garment are very popular for students at the moment.
To sew zips successfully you require the correct zipper foot. A concealed zipper foot is bought as an additional accessory and resembles twin archways side by side.
Selecting the correct zip can be problematic too. By the time you have located the colour and the length that you require you may well inadvertently buy the wrong one. Concealed zippers are distinctive with their slender teardrop zipper handle and teeth on the reverse of the zip and are only available in a limited range of colours.
To insert the concealed zip, preparation is key: unzip the zip and with a warm iron press the zip flat, there is a natural curl along the length of the zip just inside the teeth try and iron this out (this should only take a few seconds) do not apply the iron to the plastic teeth. Tack (on your machine is fine using a longer stitch length and high contrast coloured thread) a seam line on the garment opening where the zip will be. Tack each seam separately, not taking the seam together, you have two lines of stitching. Undo the zip, place it face down on the right side of the garment so that the raw edge of the zip (as opposed to the unzipped teeth) is closest to the raw edge of the fabric. Pin in place with the pins parallel to the zip and the sharp end of the pin pointing towards the opening, lining up the zip teeth on your taking line. Only prep one side of the zip at at time. Sew towards the end of the zip taking out the pins as you get to them. When sewing the left hand side of the zip use the left ‘archway’. When sewing the right hand side of the zip use the right ‘archway’ of the concealed zipper foot. The line of stitches should run as close to the open teeth as possible. The unfinished seam below the inserted zip is then finished with the regular zipper foot.

March 15, 2017
Please accept my apology of posting this blog again (although updated) as at each cycle of six week classes I meet new students who have been home dressmakers who are confused by the range of patterns available to them, or new sewers that just don’t know where to start. So I have updated the post for recent students and new sewers who have yet to discover the fun at The Sewing Shed.
The high street was re-sized in the 1970s in the UK, as better nutrition and a more varied diet was developing larger female silhouettes with different proportions to our mothers and grandmothers. Dressmaking patterns were not necessarily re-sized to take into account the more modern figures. This is why on the reverse of many patterns bought today we are one, two or even three sizes larger than our ‘usual’ high street dress size. This can be said for Simplicity, New Look, Burda, Vogue, Butterick and includes Emma Garry. Please also be wary of Merchant & Mills as their garments are unstructured giving an over sized look to the finished garment.
For beginners learning dressmaking I recommend the following patterns, particularly Colette as these are more true to the dress size that we are used to. There are also more artisan makers that sell at sewing shows and on line for example, Amy Butler, Sew Over It, Simple Sew and Tilly and the Buttons. I can personally vouch for Amy Butler, Avid Seamstress, Colette and Simple Sew having used many of their patterns in my classes. I stock a carefully selected range of new lesser known pattern brands; Colette, Sew Liberated, Made by Rae as well as bag patterns by Noodlehead and children’s patterns by Oliver + S and Made by Rae.
For all sewing patterns you should reach for the tape measure and use these measurements when deciding which pattern to buy and which size garment to make.

February 22, 2017