Address: The North Chapel, Ashlands Road, Ilkley, LS29 8JT


My lovely friends at Janome have sent me a super new shiny 6234XL overlocker for us to use in The Sewing Shed! Overlockers have become increasingly popular as the demand for dressmaking tuition has increased. Many students are scared at the combination of all those threads the quickness of the machine and a cutting blade, but with careful guidance their fears can be over come, and the benefits of that shop bought professional finish are all too apparent.
The new addition completes the range of machines for students that I have which means there is a computerised sewing machine one per student and 2 overlockers; one threaded in white and the other in black to aid all those dressmaking projects.
What exactly is an overlocker? Easy to identify on shop bought items the overlocker stitch can be seen as a neat loopy stitch over lapping the raw edges of the seams of a garment. The stitch actually stretches so it is a real boon for sewing stretch fabrics such as t-shirts, leggings and nightwear. The blade can also been dis-engaged to sew along an edge that does not need to be trimmed and create a rolled hem.
Overlockers really aren’t that scary to re-thread if they come unthreaded or a needle breaks (as I am well practised at this) but there is a handy colour coded route marked on the machine and tweezers in the tool kit that help with the precision threading. To aid the machine from coming unthreaded after the seam has been over locked you should continue to sew to produce a chain of stitches approx ten centimetres long. If you wish to change the colour of the thread – the easiest way is to cut the existing threads just above the spools, reload the machine with the new colour and tie the new colour thread to the old colour thread using a reef knot. Open up the door on the front of the machine and from the stitch plate gently pull the thread through the threading mechanism until all 4 needles are loaded with the new colour.
Students lucky enough to own their own are welcome to bring them into class to have 1:1 help and guidance to build their confidence.

February 12, 2017
Last week was busy in The Sewing Shed with alterations and re-vamps! I helped two students alter sale bargains that they could not resist that were too large for them; a velvet jacket from Monsoon and a designer cerise dress. The jacket was remodelled by removing the shoulder pads and realigning the soft blazer collar into a Chinese style wrap over front with the addition of three buttons. The cerise dress and the loose lining were carefully shortened and the sleeves remodelled to fit a more petit frame.
Another student brought in a pretty Next blouse picked up in a charity shop with an attractive exposed zip, but with puffy sleeves. The sleeves were unpicked and recut to a lower curve to take away the volume at the top of the sleeve for a more streamline silhouette. Shortening denim jeans were explained to a group with the aid of bias binding. And a couple of A-line skirts taken in as they were too big.
I must admit I love revamping and mending much loved or outsized clothes in my wardrobe. We all have a range of clothes sizes in our wardrobe so taking in the clothes that have simply grown in the wash or taking them in after successful weight loss can be a very satisfying update to your wardrobe and saves you the bill at the alterations shop.
Not sure you have anything in your wardrobe you would be brave enough to cut up? Why not turn all your hangers around the wrong way and then as you wear, launder and return them to the wardrobe you put the hangers the other way around. This way after a month you can see the items you favour and those that could maybe do with a revamp. Even if its a pair of trousers that you can only wear with one pair of heels, would it be worth taking them up to make them more wearable? Just be careful with seasonal items that may be lurking in there, you may want to revisit these in a few months time.
Go on be brave, even if its just to add a fabric corsage to your jumper or funky trim to give a your stripy top a lift!

January 26, 2017
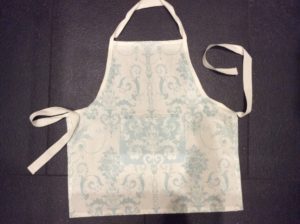
I designed this pattern a few years ago when my daughter was small and I was time poor. I am always drawn to interesting prints and pattens in home textiles and at this time of the year high street stores and supermarkets often have bundles of pretty printed tea towels in their January sales.
Its a winner on so many levels as its a quick satisfying sewing project for a busy super Mum, and it also filled up my emergency present stash for when my daughter came home from school with another party invitation. The finished article is a really cute apron and recipients have worn them whilst baking or crafting. Three edges of the already hemmed tea towel are reused as the edges of the apron.The finished apron fits ages 4 – 8.
Choose a fun or pretty tea towel that you like, you never know the vintage souvenir one lurking at the bottom of the kitchen draw may work equally as well as a brand new one! Bold colours or prints of London buses (you know which high street shop I am referring too) work well for boys.
Materials Required: Tea towel, matching thread and 2.1m herringbone tape measuring 2.5cms wide.
1)Ensure your printed tea towel is the correct way up, and measure down from the top edge 16cms. Mark this line with a magic marker and cut this piece off the top edge. Keep this piece to use as a pocket, if you have two coordinating tea towels it is fun to use this one as a pocket for the other apron (as shown in the photo).
2)Fold the tea towel in half lengthwise, mark 12cms from the centre crease on the top raw edge. On the side of the tea towel mark at 32cms from the bottom hemmed edge. Join these two marks with a gentle curve to make the curve to fit below the arm, a very large dinner plate or round kitchen tray may be useful as a template.
As you have two layers of fabric, pin them together before carefully cutting along the curve to ensure you get a matching pair of curves.
3) Open the tea towel out flat. Create a hem on the top raw edge of the tea towel.
4) Use the off cut for a pocket. The top edge is already hemmed so use this as the top edge of the pocket. Carefully press under the raw edges of the pocket, pin and top stitch in position. The bottom of my pocket is 15cms from the bottom edge of the apron.
5) Hem the raw edges of the herringbone tape. Measuring from one edge of the tape mark at 55cms, then at 85cm, then at 123cms. The raw curved edge of the tea towel are encased in between the folded herringbone tape. The first mark leaves 55cms of loose tape to tie around the waist, between 55cms and 85cms enclosed the raw curved edge (yours may be a slightly different measurement depending on the depth of curve). 38cms of tape should be allowed to facilitate the loop over the head.
6) Repeat on the other side of the apron, enclosing the raw curved edge and leaving 55cms loose at the end to tie the apron around the waist. Apron now complete!
January 19, 2017
With just 24 hours left to go before New Years Eve – a quick fix to your party wardrobe really can be turned around in a day! Sequins have appeared everywhere for the party wardrobe this winter with three of the Ilkley womenswear stores this month showcasing short sequinned skirts in their window displays. This teamed up with roll neck for day wear or a sparkly top for evening wear would clearly be the ‘must have’ update for my party winter wardrobe. The secret to the beautifully fitted sequinned garment is the stretch in the fabric to give it a really good fit. Such fabrics can be hard to source or tricky to buy on the web as you can’t necessarily tell the quality of the sequins. Indeed a quick look in Boyes to look at their stretch selection confirmed that their sequin fabrics would be more fancy dress than chic party update, but do not despair…
Ilkley is awash with charity shops, which to the home sewer should be viewed as exciting fabric stores where the opportunity to buy, alter and redesign garments are limitless. Just popping into four stores I managed to find exactly what I was looking for! Al be it a dress where the off the shoulder top was the much sought after stretch black sequinned fabric with a plain black stretch skirt. A quick shimmy in the changing room trying the garment on upside down proved there was enough room in the sequin section to fit over my hips to form a skirt and enough fabric in the black section to make an integral camisole which would assist in keeping the skirt in place and not riding up. Unpicking the garments lining and armholes, taking in the seam on my overlocker and the addition of shoulder straps meant that my new party piece was complete for a fiver.
If you don’t have the courage or the luck scouring the charity shops tomorrow – why not pop in to Attic Womenswear where the lovely Sarah and her team can help you pick one out http://atticwomenswear.com/products/samsoe-samsoe-feve-sequin-skirt or just be brave enough to bring much loved existing wardrobe pieces in your next session at The Sewing Shed for a quick party update.
December 30, 2016
This week I have welcomed new students to The Sewing Shed who have been inspired by The Great British Sewing Bee to embark on dressmaking for the first time. I thought it would be helpful to list some top tips to help demystify dressmaking, and to reinforce what new sewers have been taught in their first class.
1: Dressmaking is the term used for all clothes making, not just sewing dresses.
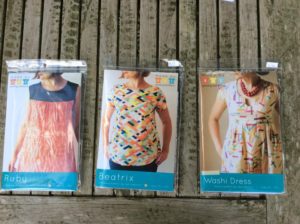
2: Always check that the dressmaking pattern will fit you! There are body measurements and finished garment measurements on the reverse of the packet of most good patterns. Get your tape measure out and check, don’t go by your usual high street size as these will differ by as much as 3 sizes. Above the measurements in inches is your corresponding dress sizes.
3: Why are there 2 sets of measurements; body measurements and finished garment measurements? Body measurements are your vital statistics, but it is worth measuring the finished garment measurements against your body so you can see how roomy the garment will be when finished. This is to allow for ease of movement when you are wearing the garment, but you may decide to go down a dress size for a closer fitting look.
4: The measurements are shown in inches on all patterns. Some patterns have them in metric as well – often explained in French on the right hand side of the reverse of the pattern packet. Dressmaking is traditionally in inches and it has stayed this way.
5: How much fabric will I need? Fabric is sold in 2 widths; 115cms and 150cms. Below your corresponding size, on the packet, it will tell you how much fabric you need. I suggest you take the pattern to the fabric shop and let them help you with this bit, as sometimes more is required for a bold pattern to match the pattern repeat.
6: A dressmaking pattern has many sizes inside the pattern. You need to cut out the dress size that you require. For speed though, I always roughly cut out the pattern pieces first with paper scissors, then pin the pattern really well onto the fabric placing pins parallel to the edge just inside the size you are going to cut out. Any tricky bits mark the line with a highlighter pen. Then cut accurately on the size line that you require using bent handled fabric scissors.
7. Always aline the directional arrows on your pattern pieces parallel with the selvedge of your fabric. The selvedge is the manufactured edge as it comes off the loom, often there are small pin like holes along these edges. Doing this ensures a straight grain to give the garment the correct drape. Fabric should be cut double, with the right side of the fabric folded together – the wrong side of the fabric facing out. It is helpful to mark the wrong side of the fabric with chalk crosses.
8. Always embrace pattern markings; notches and tailors tacks. Notches are the small little triangles on the edge of the pattern. Cut inwards exactly on the lines for neat accurate notches. Dots on your pattern pieces, should be marked with a tailors tack; thread a hand needle with a brightly coloured double thread, with no knot. Start on the top of the paper pattern and take the thread through the pattern and fabric layers twice as if you were doing a loop the loop on a roller coaster. Carefully pull the tack through the paper and separate the 2 fabric layers, which will take up the slack in the loops, snip the thread with a small scissors between the two layers of fabric.
9. Take all your pins out of the pattern paper, except one – so that the pattern is still attached to the fabric and the piece can be easily identified. If your garment is more than 8 pieces you should name each piece individually to limit mistakes. Low tac masking tape labelled with biro pen is useful for this.
10. Test your stitch on a scrap piece of like fabric, use a Gutterman ‘sew all’ polyester thread as this glides through the fabric and gives a strong seam. Don’t just use the stitch length that is available when you turn your sewing machine on – a mid range stitch is good for dressmaking.
December 7, 2016
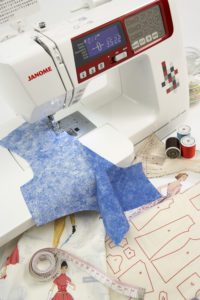
Its that time of year again when students ask if I can recommend a sewing machine for them to add to their Christmas lists! I have also been known to work in cahoots with nearest and dearest, answering covert emails and the odd panic phone call. “I am in the sewing machine shop now! which one did she want?” Having established The Sewing Shed over 6 years ago, I have seen many makes and models of sewing machines. I however have the enjoyment of using Janome machines in class. The Sewing Shed is endorsed by Janome and I have the pleasure in using their lovely DXL 360 machines. This arrangement was agreed upon after careful consideration having researched the market to get the right machines for my students to use, with a brand that had an accessible range of machines.
Janome machines are robust and their motor size for the domestic sewer and build quality is excellent. All Janome machines are built with a metal body or metal internal frame and are powerful and efficient. Their price structure for a computerised machine giving you a ‘one-step’ button hole and speed control starts at just over £300.00. These really are a machine for life. They often bundled some accessories into a quilting kit for an annual promotion. And a good range of additional presser feet are available from around £17.00.
Lock stitch is a must and some mid-range machines now even have automatic under bed cutters. Please see Janomes machine buyer’s guide for further information http://janome.co.uk/brochures/sewing-machine-buyers-guide/files/assets/basic-html/index.html#1 They also have a search facility to find your local retailer on their website http://janome.co.uk/retailer-search/ . Although I highly recommend White Rose Sewing, Commercial Street in Harrogate who have an excellent range of machines lined up in price order so you can try before you buy, and they also do a selection of Overlockers too!
November 16, 2016
Much excitement in The Sewing Shed over the last few weeks with the opening of the new John Lewis store in Leeds. The destination store at the head of the new retail development Victoria Gate next to the market in Leeds has been long awaited. On my ‘birthday treat’ visit on Monday I happened across a few of my students and Mums of students who just couldn’t keep away either; admiring the beautiful new store, the carefully chosen range of quality products that John Lewis are known for, and all the JLP card holders queuing up to get their free cake and coffee. But my destination was of course the haberdashery department on the top floor.
Just the day before The Sunday Times reported in an interview with John Lewis’ new managing director, Paula Nickolds that “it is undergoing its most radical makeover in decades. Some traditional products, including hats and haberdashery, are being downgraded in favour of new services, including holidays, in-store prosecco bars and bikini waxes”. Ms Nickolds, who takes up her position in January as the store’s first female boss interestingly began her career in the store’s haberdashery section.
This prompted an immediate online backlash from customers and crafters with 5,000 signing an on line petition to protect what many see as a British Institution. The retail giant has since backed down and the department store confirms the beloved buttons will, in fact, be safe. Although the range of fabrics in the Leeds store is limited, due to floor space, I suspect – their range of equipment and gadgets is excellent with many a few items finding their way onto my Christmas list. If you want to stock up on sewing gadgets from quilting clips and tuning tools I recommend a trip, but surely what MS. Nickolds hasn’t realised is that a Prosecco bar and haberdashery department might site quite nicely together!

November 9, 2016
In the last ten days two students have asked if I can recommend a beginners project for their first encounter into patchwork. Clever beginners patchwork should start with shapes that are easy to sew together and with the use of clever cutting and re-piecing (or sewing together) they can give a dramatic and complicated finished result. A strip quilt as it is known in the UK or a Jelly roll quilt, is what our friends on the other side of the big pond call the technique is a quick and satisfying patchwork project for the novice sewer. The patchwork grows really quickly and can be used for a baby play mat (as shown below) cushion covers, table runners, lap quilt and much more!
Strip quilting is created by sewing strips of fabric together. The strips of fabric are made from the full width of the fabric, cut from selvedge to selvedge. All strips measure the same width. The strips can be cut by the patchworker or can be bought pre-cut in coordinating packs or bundles often referred to as ‘jelly-rolls’, which is where the other name for this technique comes from.
The strips are sewn together edge to edge using the same seam allowance. Three strips each measuring 8cms in width should be sewn together using a 1cm seam allowance. The three attached strips are then cut at 20cm intervals to form a 20 x 20cms square. This is repeated until you have enough squares for your completed quilt project. Two 20 x 20cm squares are sewn together rotating each square 90 degrees so that the long edge of one piece patchwork is sewn to the short ends of three other strips. One way to speed up the sewing process is to use a quarter inch foot, but I have specified above the metric equivalent as many new patchwork quilters do not possess this foot. If you are lucky to have a quarter inch foot your dimensions would be as follows;Three strips each measuring 3″ in width should be sewn together using a 1/4″ seam allowance. The three attached strips are then cut at 8″ intervals to form an 8 x 8″ square.

November 2, 2016
Could embroidery be the secret to stress relief and bonding with your colleagues? was an attention grabbing headline I found in my monthly ladies fashion magazine! The November edition of RED magazine highlights the creative threads (please excuse the pun) that companies are going to in order to find an on trend but different approach to team building days and staff bonding experiences.
The editorial team at Red Magazine embraced the talents of an accomplished sewing tutor who has set up workshops designed to revive and reconnect with their staff. They were guided through the process of creating an embroidered wall hanging to grace the communal space in the office. The question was, could an afternoon of sewing away from the pressure of their desks make them more productive and happier?
The talented tutor carefully guided the team through the process of designing their own motifs and coaxes the more tentative sewers to have a go. Many sewers are haunted by the mistakes made in school sewing lessons and this was true for some of the publications team. The author commented ‘that as adults we rarely step out of our comfort zones to learn new hobbies; in creating the embroidery each hour was new and challenging and it felt good’. They were invited to make a motif that symbolises what the magazine means to them. There was a mixture of images from awards, to cups of tea, To Do Lists and fashion icons. Their tutor commented that ‘they all had such individual responses’ which I believe resulted in an insightful afternoon but also a stunning decorative collective piece to hang in the office that was created with free motion machine embroidery and hand embroidery. One of their team commented it is a real piece if unity, strength and cohesion and gave them an opportunity to be mindful and live in the moment.
Having recently been asked to pitch for a Yorkshire based communications giant more creative ‘away days’ are clearly filtering North!

October 16, 2016
Crazy patchwork is a very easy and satisfying patchwork technique, which can use up oddments and scraps left over from previous projects. It has readily become known as a traditional technique used in quilts particularly in North American. On mentioning Crazy Patchwork it conjures up some quite hideous images of ‘home spun’ eclectic mixture of awful clashing colours and is not a technique that I would readily embrace.
However on my recent holiday to the South of France we dined at a restaurant that had these very stylish crazy patchwork embellished chairs – which I felt I just had to share with you! The final patchwork piece has been upholstered onto the chair the initial patchwork had been patched together with a sewing machine. It just goes to show that any sewing technique done well can be used as a stylish addition to grace any home.
Crazy patchwork is created by sewing fabrics together in what appears to be a haphazard crazy pattern, but this is not necessarily the case, like with all patchwork careful planning and selection of the right fabrics will ensure you are rewarded with a truly attractive piece at the end of your endeavours. Crazy patchwork panels can then be incorporated into many items of home furnishings not just quilts! To create a crazy patchwork piece first make a paper template to the dimensions of your desired panel, for example to use as a cushion cover or on a bag. Then using a pencil and ruler divide this template in to a geometric pattern to create straight edged pieces – remember to add seam allowance on to these then can be used as your pattern. Care should be taken to ensure the pieces are not to small. you also need to consider your order of work carefully to plan which pieces need to be sewn together in which order (numbering your pattern as you go) to ensure you are always sewing in straight lines.

October 13, 2016