Address: The North Chapel, Ashlands Road, Ilkley, LS29 8JT


Stretch fabrics are becoming increasingly popular in classes, and use of an over locker is giving a really professional finish, but students are wanting a more professional finish for hems and necklines.
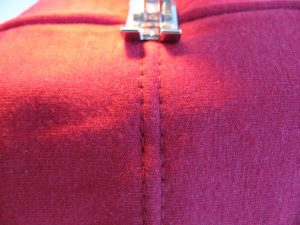
If you purchase a shop-bought t-shirt you will notice that the hem appears finished with a looped thread from the wrong side of the garment and from the right side of the garment there are two rows of parallel stitches. This is produced by a cover stitch machine but can easily be re-created by the domestic sewer with the use of a twin needle on their sewing machine.
The twin needle has a single shaft that fits all sewing machines, it creates the parallel lines on the right side similar to the cover stitch effect and on the reverse the bobbin thread produces a zigzag as it travels between the two needles. The zigzag stitch of the bobbin straightens out when the fabric is pulled so that the thread does not break.
Each needle is fed with its own thread, the Janome machines we use in class have an additional thread holder to accommodate the second thread. If you machine doesn’t have this attachment you can always place two spools or a spool and a bobbin (if the shaft isn’t long enough) on the thread holder. The machine is then threaded up in the same way as when using one thread, but it may be necessary to miss out the last hook above the needle so that the threads do not get entangled.
Press up your hem allowance, a 2cm hem looks good on a t-shirt top and pin in place from the right side of the garment. Sew 2cms from the folded hem edge so that the parallel straight stitches show on the right side and the raw edge of the hem is caught with the zigzag stitch on the reverse. Twin needles come in different sizes and this relates to the distance between the needles, a 4mm is suitable for a hem.
April 5, 2017